This are directions I followed around the internet to install VB6 on Windows 10.
This are the steps.
1- First you must get the VB6 installation files and save it in a folder in your computer (you can save it anywhere in your computer). I had an old cd so all I did was transfer the file to the folder 🙂
2- You got to edit the file SETUPWIZ.INI which you will find in the the installation folder because VB6 setup will try to install the old Java so to stop this you need to use notepad or what ever editor you use and delete ie4\msjavx86.exe from the line VmPath=ie4\msjavx86.exe it should look like this.

Save it!!
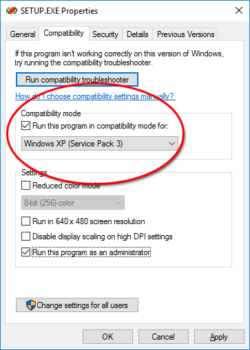
3- Now you need to go back to the setup folder and make sure you that the setup.exe is run under the old Windows XP like this right click SETUP.EXE choose Properties. Select the Compatibility tab and check to box Run this program in compatibility mode for: and set the value to Windows XP (Service Pack 3). Also make sure you check the box Run this program as an administrator and press the Apply button.

4- Now run the Setup as Administrator 🙂 and follow the directions.
Extras:
I like to use the VB6 Windows look without everything being together, so to change that click Tools than Options than Advance there check SDI Development Enviroment and restart V6 again.
Also once you done that you will notice the the windows tend to drag, so you must change the VB6.exe compability mode located in C:\Program Files (x86)\Microsoft Visual Studio\VB98\VB6.exe. Just right VB6.exe and change the Compatibility Mode for VB6.exe like we did for the SETUP.EXE in step 3 🙂
Helpful Links:
https://www.codeproject.com/Articles/1191047/Install-Visual-Studio-on-Windows

